Monday, August 1, 2022

Grandma's Quilt

 My Paternal Grandma was a quilter. I mean a hardcore, full size, wood frame, hand sewn quilter. I remember as a kid in the 60s and 70s going to visit my Grandma in Somerset, Ohio, in her old boarding house on the main street to town. In her parlor was a very large quilt frame, at that time it looked huge to me. On the frame was always a quilt in the making. I imagined she had her friends over once a week to a quilting bee where everyone was talking and stitching.

I found this picture online and it closely resembled my Grandma's frame size. This was labeled as a Civil War style quilt frame. It is made with a wood frame and held together with wood C clamps. I don't remember Grandma's frames construction, but I do remember that it was very large.

Grandma's quilts were always in our house when I was growing up. I had one on my bed growing up and took it with me when I moved to my first apartment. That quilt moved with me to California as a newly wed, then to Indiana, Virginia and Texas. This quilt was machine washed so many times that it became thread bare. Then about 35 years ago, or longer, I packed it away in a trunk with all my treasures.

A few months ago I decided to frame some crafts and mementos from the women in my life. Mine and my husband's mother, and grandmothers are represented. So, my husband went into the attic, and into the trunk to retrieve the quilt. Boy was it in bad shape. At that point I had to decide if I was just going to pack it back up, or cut it to make something special out of it. I consulted my sisters, my sounding board, and they encouraged me to make something out of it that I can pass on to my kids and grandkids.

My Grandma's Quilt

I took this quilt out of it's plastic covering that is had been in for over 35 years in a trunk. It was really stained and dirty, so I soaked it in my washing machine with Oxi Clean and Tide for hours. I then washed it on the delicate cycle, and dried it at low heat. When it was as clean as it was going to get, I spread it out on my craft room floor. Then I went over it inch by inch to see the condition of this special quilt. Sadly, the quilt was in bad shape and thread bare in many sections. Being able to see all the hand stitches and designs up close was amazing. Along with the patchwork patterns. Grandma's quilt had nine sections of patchwork squares, and down the columns and rows of these sections are hand stitched stems with leaves ending in each corner with a hand stitched daisy like flower. The quilt is trimmed in blue fabric and then quilted in each square with a double X. In one of the corners was an embroidered "S" for my Family's last name. 

My Grandma embroidered our last name initial in the corner of the quilt.

In between each patchwork square was a daisy like flower and a stem with leaves coming out in all four directions. This stitching patterned was the trim for all the patchwork squares.

In the picture you can see the X quilting on each patchwork square. There are squares of different color, separated by cream square,s and all were quilted with the X.

Cutting that quilt was one of the hardest things I have ever done. First, I cut out the Embroidered "S" so I could frame it. Next, I went though and picked the sections that were in the best shape. I decided to make a pillow using different section of the quilt. Some of the cut sections needed to be mended, so I zigzag stitched with my sewing machine on some spots that were thread bare.

This is a example of my zigzagging the quilt to strengthen it a bit.

As I was going through the quilt and cutting out sections I saw some stitching that looked like the letter g along one of the edges. At first I thought it was for my grandma's name, Grace. Instead it was the number 9. Looking closer it was a date, 1934. I started tearing up and felt very grateful I had not cut through it. The date stitching was done with cream thread on cream fabric, so it was very hard to see. Now, I was meticulously going around the edges to make sure I didn't miss anything else. Lo and behold, at the bottom of one of the stems is another date, 1928.  Now I needed to figure out what these dates meant.

This date "1934" was along the trim of the bottom of the quilt.

The date "1928" is above the shadow in the picture. I was located above one of the flowers.

The framed cut date pieces of Grandma's Quilt

The framed embroidered S from Grandma's quilt

I was doing some research online and found a website Sherriquiltsalot.com and she had a post on labels on quilts. She recommends you label your quilt with your name, location, date started and date ended. Also, she talks about a fellow quilter who free hand stitches her name, and dates into the boarder. Sound familiar? I am certain that my Grandma stitched her label into the boarder of her quilt. Her initial in the corner, her start date of 1928 and her completed date of 1934. Mystery solved!!

Now, I am wondering why it took her so long to complete this quilt. My grandparents bought a farm in the late 1920's, and I would guess that when the Great Depression started in 1929 she was a bit busy trying to survive. The quilt may have just had to take a back seat to working the farm. She had two young sons at the time and I am sure they were struggling as a family. I know my Dad hated talking about those years. He felt like he lost his childhood because of the farm work. He was not a happy farmer. So, maybe life just got in the way of her quilting, or she put it away to make other quilts that did not require as much work. Or, maybe she helped other friends finish their projects. We will never know for sure, but the timing of the Depression and the long gap in the dates on the quilt makes sense to me.

In my mind I solved this mystery. Now, back to my project. I cut the dates from the quilt and framed them to hang in my craft room. I sewed the many acceptable cut quilt pieces together into a large piece to make a pillow. I then cut the large Frankenstein piece into a rectangle. I folded it in half to make a square and sewed the sides and half of the top closed.  I stuffed the square, sewed the top closed and now it was a heirloom pillow. 

You can see all the pieces of Grandma's quilt that have been sewn together to make this one pillow. 

This is the other side of the pillow.

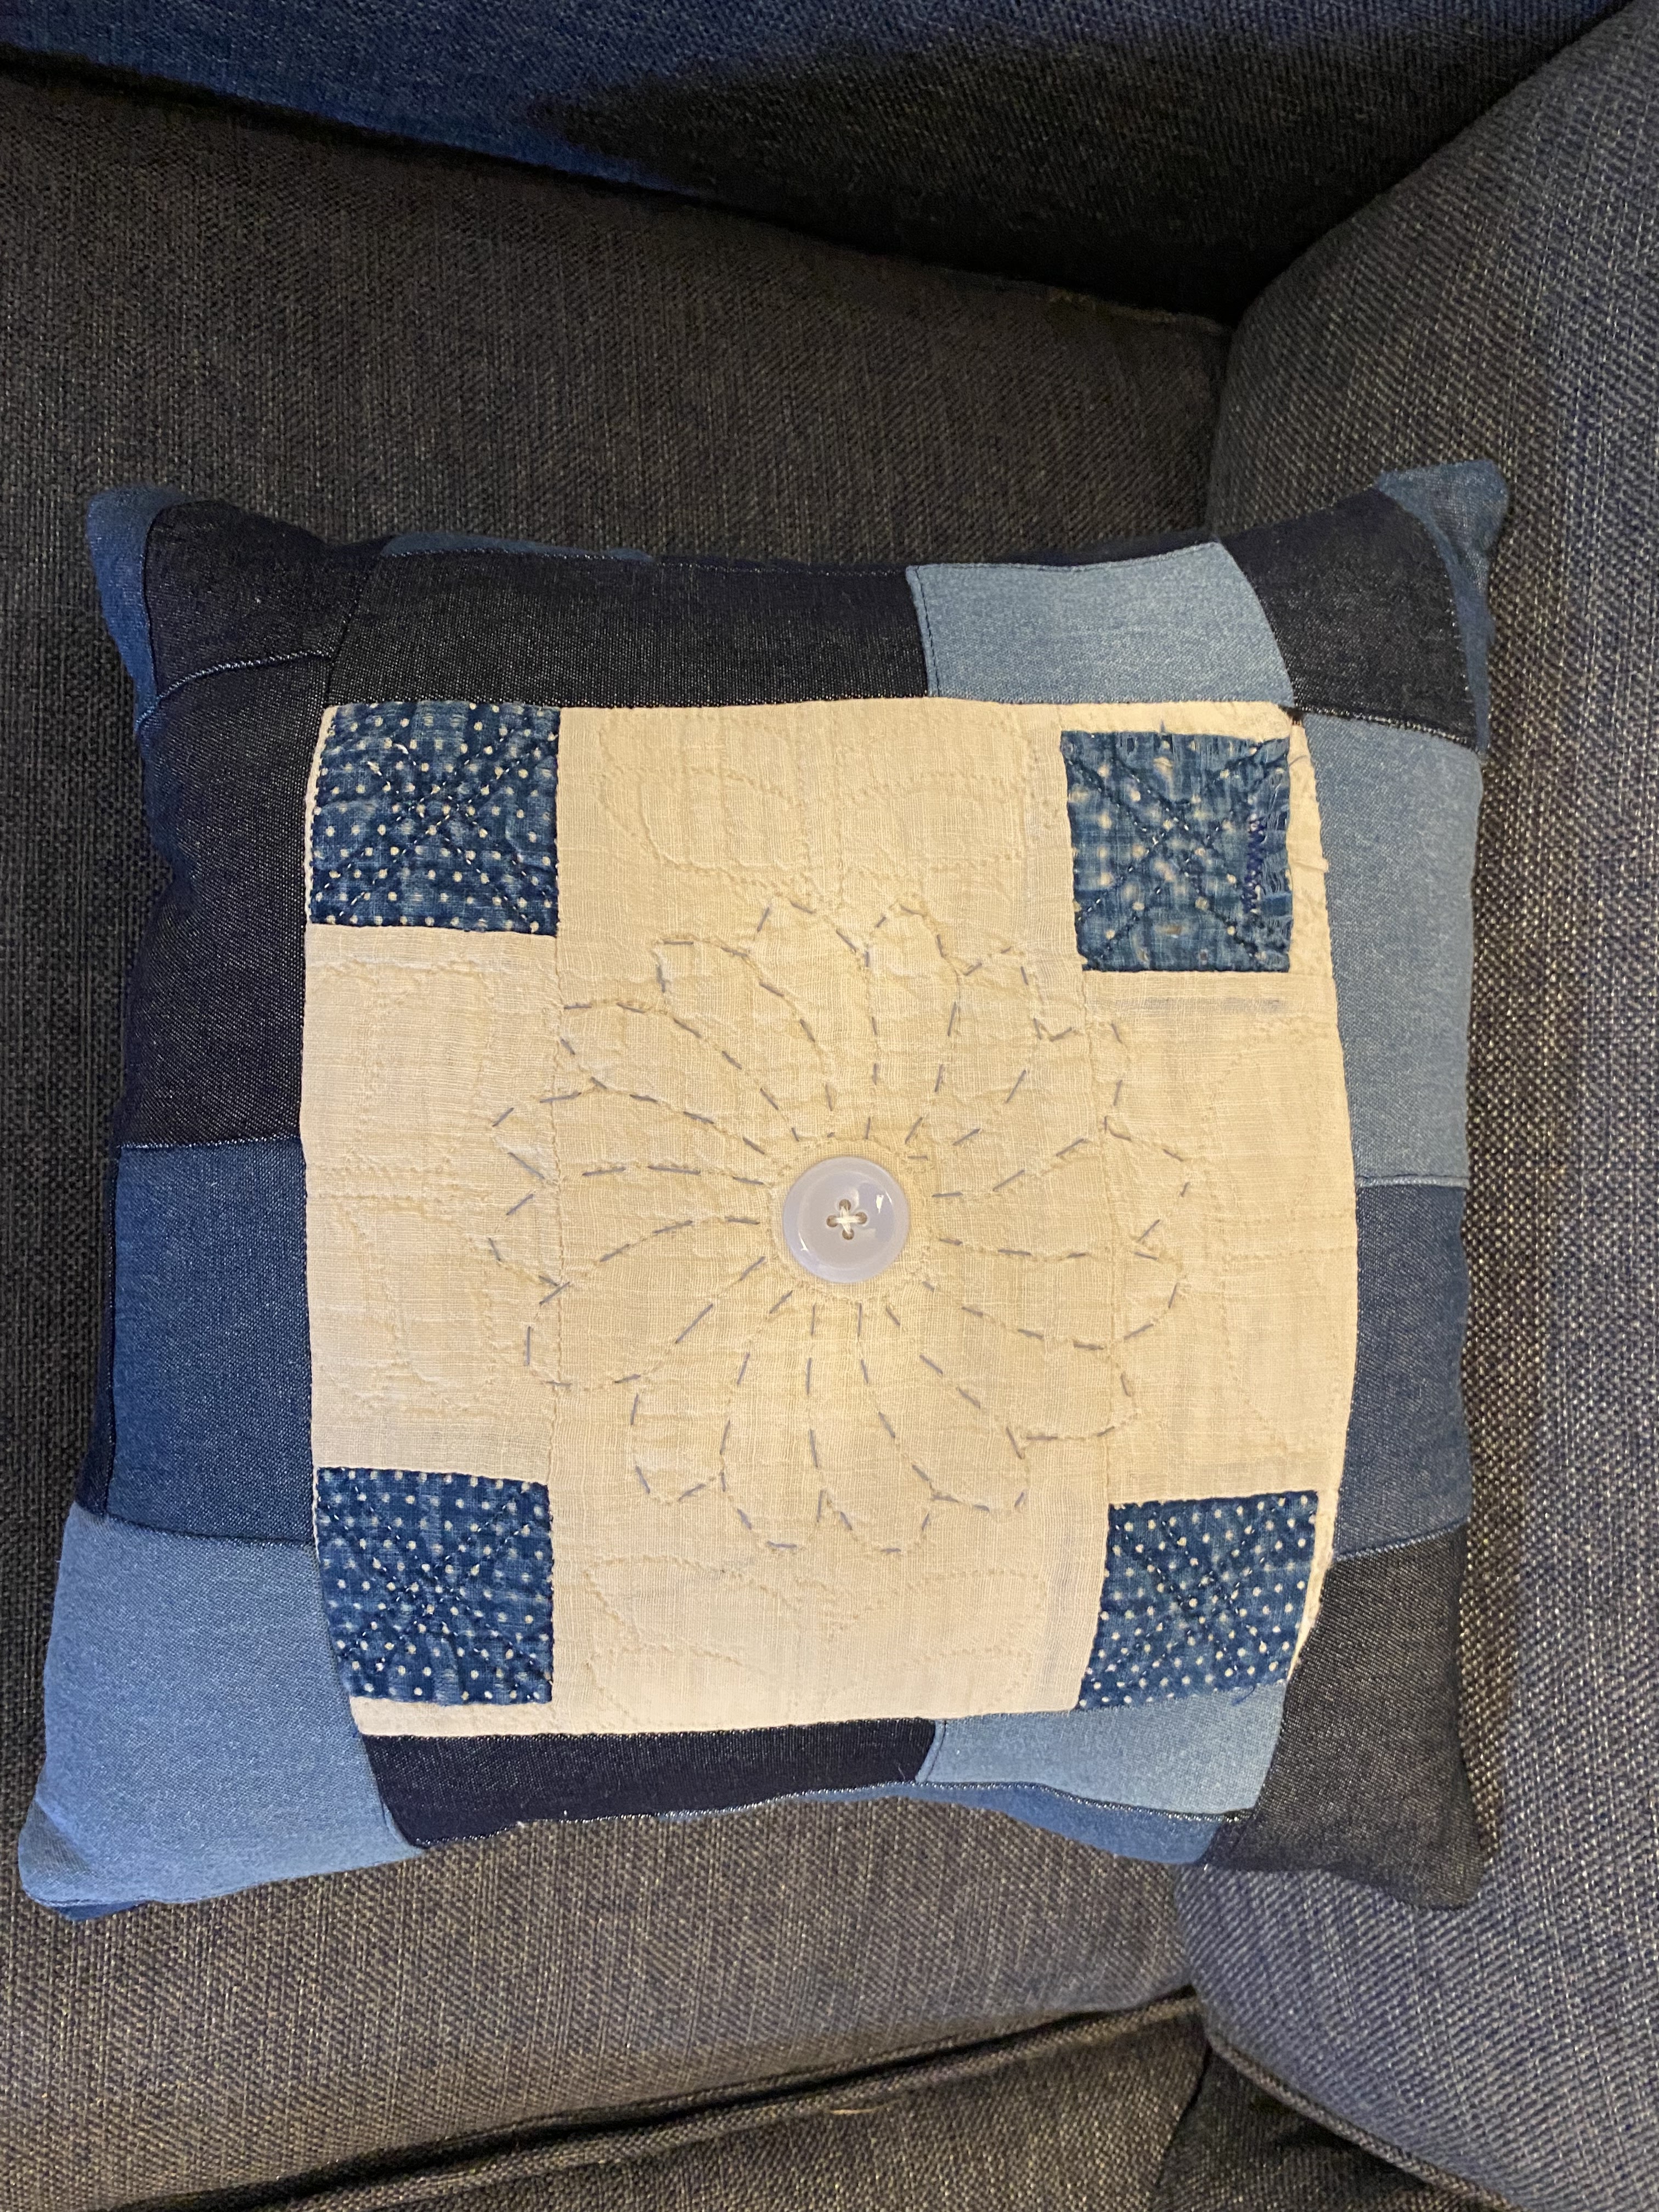
 I had a large quilt piece that included four corners of each large patchwork square that had  a daisy in the middle.  I used some light blue thread and stitched the piece to highlight the petals of the daisy, and sewed a blue button in the middle of the flower. I had some patchwork denim fabric I used to frame the quilt piece, and to also use for the back of the pillow. Another cute heirloom pillow!

The embellished quilt daisy from Grandma's quilt 

The back of the Daisy pillow

One of my sisters did not have a Grandma quilt, so I sent a few cut pieces for her to frame. Now, I have three framed pieces, the embroidered "S" and the two dates, a pillow made completely out of quilted pieces and an embellished pillow. I also have all the left over cut quilt that I have no idea what I am going to do with.

 At least not yet!


Monday, July 18, 2022

Look to the Sky

My husband and I picked our grandkids up from camp last week in my husbands car. His car is not as kid friendly as mine, which means no DVD players for the kids to watch movies. So, we played the game, "What shapes do you see in the clouds?". Luckily there were actually clouds in the sky that day. I shared with the kids that when I was a kid I loved laying in the grass in Ohio and play that game. Clouds can look beautiful and scary, and sometimes both at the same time.

 I was looking back at my iCloud pictures (no pun intended) and noticed all the cool cloud and sky pictures we have taken over the years. I thought I would share some in this post. Most are of the Texas sky, but I do have some from the air and from states across the country.

We have pictures from Sunrise to Sunset, cloudy and clear, even some with rainbows and balloons. It is always nice to just sit back and look at the sky and marvel in its beauty.

A sunrise outside of our hotel room in Fort Worth the morning after an awesome Paul McCartney concert.

A sunrise from our hotel balcony in St Augustine, Fl.

A storm coming in while we were visiting  our son in Arizona.

Texas storm clouds in our neighborhood.

More Texas storm clouds in our neighborhood.

Yes, more Texas storm clouds in our neighborhood.

Storm rolling in at Fort Walton Beach, Florida.

Yep, more Texas storm clouds in our neighborhood.

A beautiful Texas blue sky, no clouds to be found.

A common site around our house, hot air balloons in a blue sky.

This balloon is literally at my front door.

A beautiful full moon in a cloudless sky.

Beautiful Florida Clouds.

Afternoon Texas Rainbow. There is not a pot of gold at the end of the rainbow.
 Looks more like a porta pot to me.

We were flying above a storm in Ohio.

More Ohio clouds from the air.

Cool clouds on my drive in our neighborhood.

This was a very cloudy day in Pensacola, Fl where we saw the Blue Angels practice. Because it was so cloudy they flew very low and put on a great show with a beautiful cloud backdrop.

Love the clouds at Sunset.

We love to go out on the golfcart in the evenings and take sunset pictures.

This was not our normal red sunset. Love the yellow.

All beach sunsets are beautiful.

Love the color in the clouds.

Cool color and clouds in this neighborhood sunset.

The clouds on the bottom almost look like mountains.

I took these from my backyard and they are my favorites. The top clouds in this picture looks like smoke.

The red in this picture is striking like the clouds are on fire.

How can you not be amazed by the beauty?

I hope you found this post calming and relaxing. Mostly I hope it reminds you to stop every now and then, look to the sky and enjoy its wonderment.


Thursday, July 7, 2022

My Spin on Ice Cream Sandwiches

 Many years ago while on Weight Watchers I found a recipe for fake ice cream sandwiches. You used graham crackers and fat free or lite Cool Whip. You take two squares of crackers and put a few tablespoons of Cool Whip in between them. You put them in a freezer safe container and put them in the freezer. When frozen the Cool Whip tastes like vanilla ice cream.

Because the graham crackers are more WW points than I wanted to use, and they were really small, I wanted to find something else for the outside of my ice cream sandwich. I found the perfect replacement, Vanilla Pizzelles! They are only 1 point each, they are large and they are delicious. They also come in different flavors. I can't eat chocolate, or else that would have been my first choice. 

These pizzelles came in 4 packs of 8. You can make 4 ice cream sandwiches from one pack. You get 16 sandwiches per package.

I bought this brand from Target

So, you take two Pizzelles, load a couple of table spoons of Cool Whip on one and put the other Pizzelle on top. You can put as much Cool Whip inside of them as you want, I am just trying to keep the calories and points down. You also can use original Cool Whip, Lite or Fat Free. I use the Lite. 

A Pizzelle Cool Whip "Ice Cream Sandwich"

I also made a zero point banana ice cream. You put 4/5 med ripe bananas in a food processor, add half of the inside of a vanilla bean and 1/4 cup FF milk. Once it is completely blended, you pour it into an ice cream machine. I put the banana ice cream in between two pizzelles for a banana ice cream sandwich.

A Pizzelle Banana "Ice Cream Sandwich"

A few weeks ago I went a little crazy on this theme for my Granddaughter. She spent the night with us and for breakfast the next day I made her Confetti Waffles. I had a waffle left over, so I took the waffle and broke it into the four sections, put Cool Whip on one quarter section, covered it with another section, so I had two made, and then froze them. You can drizzle melted chocolate on them before you eat them.

A Confetti Waffle Cool Whip "Ice Cream Sandwich"

 My Granddaughter loved her waffle ice cream sandwich.


Monday, June 27, 2022

DIY Gift Tags

 For many years I have made my own gift tags. I bought a paper punch many years ago that is a tag maker that has a punch that puts a hole in the top to hang it.

Fiskars Tag Maker

For years I would make about a hundred tags out of plain card stock in green, red and blue. Then I would use a holiday stamp to decorate the front of the tag and write the To and From on the back.  One year I decided to make tags that were stamped with pictures on the front, and instead of writing on the back I punched out ornament or circle shapes and stamped the kid's initial on the shape. I didn't need to write who it was from, because we all knew who the crazy woman was that made the tags, lol.  

Tags made with stamps and ink and punched shapes.

Different backs of the tags

The next few years I punched tags out of Christmas printed paper and then used a "To and From" stamp on the back. These were a lot less work, but I was back to writing the names again. The writing was the part I disliked the most.

Tags punched from one sided printed paper

Then a few years ago I had a brilliant idea, if I do say so myself. I went back through my cell phone pictures and found great individual pictures of each one of my kids, grandkids, and couple pictures of my kids and their spouses. Next, I went to the Walgreens photo department online and downloaded the photos of the kids. I ordered sheets of wallet size photos of each of the pictures. I used the tag punch, centered it over the picture and made sure the hole was not in the forehead of the kids. I love these tags! All I have to do is attached the picture to the gift, no writing needed. I will only have to update them every few years.

Photo tags. I don't publish pictures of my family, hence the added flowers.

Last year for my grandkids I had a little fun with one of their gifts. I had their picture tags to put on the gift, but instead of just hanging them on the gift, I incorporated them into the wrapping paper. The kids had fun finding their pictures. 

It was hard to take a picture of this shiny paper without the glare. 


I am sure I will get tired of the picture tags one day, and I have no idea what I will come up with next. But right now they are still my favorite.


Grandma's Quilt

  My Paternal Grandma was a quilter. I mean a hardcore, full size, wood frame, hand sewn quilter. I remember as a kid in the 60s and 70s goi...